Setting up a Private Build Agent in Visual Studio Team Services
26 Nov 2016 | Visual Studio Team Services | Team Build | ALM | Azure
I've started working on a new hobby project hosted in Visual Studio Team Services (VSTS) and was keen to follow mature build and release practices on it. Given that I am essentially a one man team, I decided to make due with the free tiers. One of the limitations in this tier is the number of CPU cycles available for hosted builds and releases. This means that if I setup all - continuous integration (CI) build, standard build and release definition I am surely going to use up all the available minutes.
The goal was to keep the overall costs low without sacrificing any build and release related automation. Luckily, VSTS allows us to host our own agents on a private pipeline. This seemed the ideal a minimalist setup for me, this looked to be cheaper than having additional hosted pipelines. Also worth noting that VSTS currently provides one private pipeline in the free tier with the ability to purchase more private agents (which is slightly cheaper than the hosted).
In this post I go about setting up a virtual machine and then install and configure a build/release agent that can be used by the team builds and releases.
Provisioning the Virtual Machine
- Start off by creating a new resource group dedicated for the build server(s). This is so that we can tie the scheduler to shutdown all agents in a resource group without having to shutdown individual servers.
- Next, let's provision a new Windows virtual machine, customize this as you see fit - I used a standard Windows 10 machine. In order to make life easier, I chose a higher tier during your setup with the intention of scaling it down to a lower one once everything is setup.
- For this to be a viable build server, I installed the .NET 4.5.2 targeting pack. Alternatively, you could install Visual Studio Community Edition or any other dependencies that your particular build might require.
Installing the Agent
- Log into the newly provisioned virtual machine.
- Next, open a browser and log in to your VSTS instance from within it and navigate to settings page by clicking on the cog icon. Then click the
Agent poolssub menu in order to view the list of available agent pools. Click on the
Download Agentbutton and follow the instructions to install the agent.
While the agent's downloading, let's setup the Personal Access Token (PAT) that the agent would use to access VSTS. To do this navigate to the
Securitytab under your profile context menu.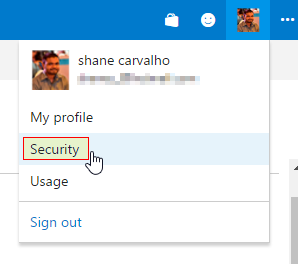
On the
Personal access tokenstab, click theAddbutton to create a new one.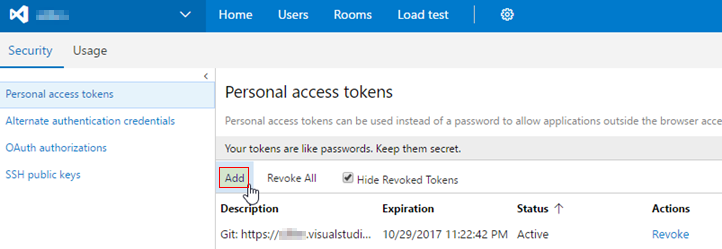
Provide
description,Expires inandAccountsinformation as appropriate. As for the scopes, provide theAgent Pools (read, manage)scope. Read more about roles and scopes here.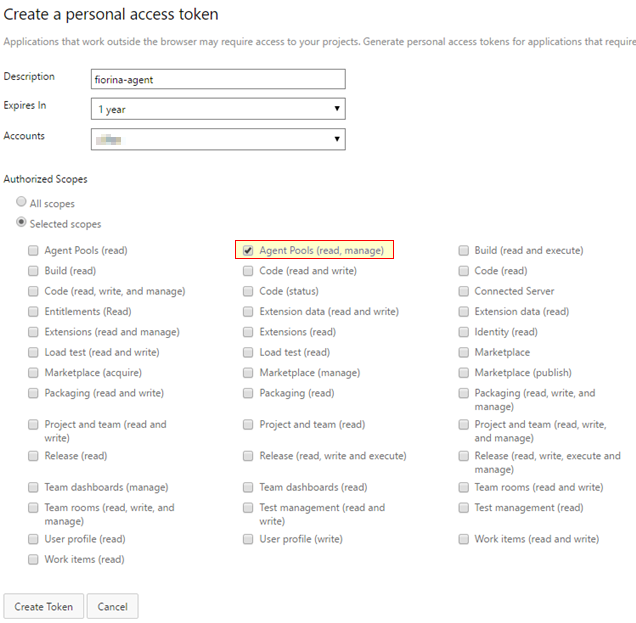
Click on the
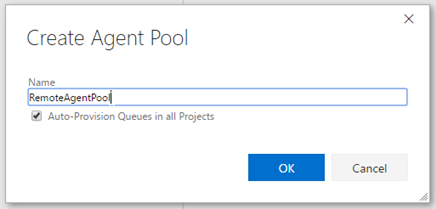
Create Tokenbutton in order to generate a token. Copy the newly generated token, we would be using this when configuring the build agent.Optionally create a new agent pool dedicated for your on-premises agent.
Configure and Running the Agent
Run the
config.cmdbatch file in order to start the agent configuration.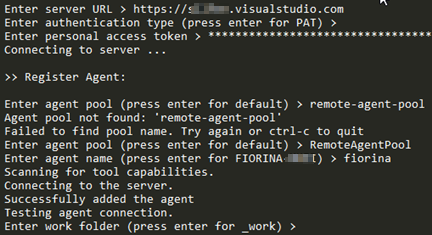
Enter the details for the following notable settings:
Enter server URL- this is the VSTS server url.Enter personal access token- The token that we generated previously.Enter remote agent pool- If you previously created a dedicated agent pool, then provide its name.Enter agent name- The name of the agent
If you did not opt-in to run the agent as as a service, manually start the agent using the
run.cmdbatch file.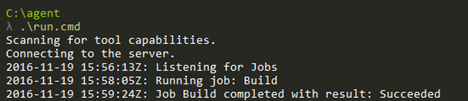
Now that the new agent is running all we have to do is to let our build know about it. Do this by editing the build definition and setting the
Default agent queuelocated in theGeneraltab.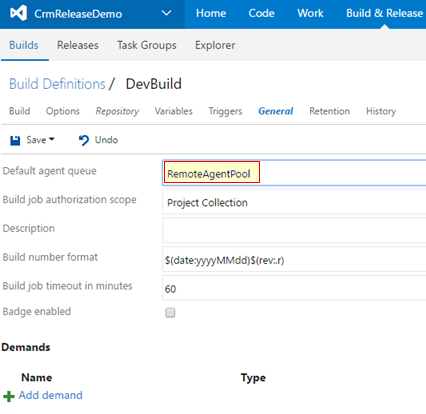
Stay tuned for the next post where I schedule the uptime of the virtual machine.
References
- Configure agents for Microsoft Release Management in Visual Studio Team Services and Team Foundation Server 2015
- Authenticate access with personal access tokens | Visual Studio Team Services & TFS
- Deploy an agent on Windows
- Configure Account and Roles vsts-agent/roles.md at master · Microsoft/vsts-agent
- Private Pipelines - Visual Studio Marketplace
- Hosted Pipelines - Visual Studio Marketplace
- Download Microsoft .NET Framework 4.5.2 Developer Pack for Windows Vista SP2, Windows 7 SP1, Windows 8, Windows 8.1, Windows Server 2008 SP2 Windows Server 2008 R2 SP1, Windows Server 2012 and Windows Server 2012 R2 from Official Microsoft Download Center