Build Pipeline as Code - YAML based CI Build for Dynamics 365 Solutions
20 Jan 2018 | Visual Studio Team Services | Git | ALM | Dynamics CRM Online | generator-nullfactory-xrm
I first learned about YAML builds a while back when I was trying into integrate a project with AppVeyor. The concept of treating your build pipeline as first class code artefact was very appealing as it opens up so much possibilities. For me personally the highlights are:
- History, versioning and branching of your build definitions
- Improve quality of build definitions and consistency across projects.
- Quickly reuse and repurpose builds onto different projects.
- Make maximum use of the underlying build platform.
These posts here and here dive deeper into the advantages and the different use cases.
A couple of months ago the Visual Studio Team Service (VSTS) team announced support for the the same functionality in VSTS. Although the feature is still in preview, the VSTS team has continued to improve the feature and now provides the ability to export existing build definitions or individual tasks. In this post, I intend to take pre-existing build definition, converting it to a YAML build definition and make the necessary changes to get it to work as a CI build.
In this post, I intend to port an existing definition to a YAML build definition and use it as a template to setup a new CI build for a second project. The source definition that I will be using is a basic version I use for Dynamics 365 projects.
Prerequisites
Visual Studio Team Services account with a
gitrepository.tfsvcrepositories are not supported at the time of writing this post.Dynamics 365 solution prepared using the
generator-nullfactory-xrmand then checked into the abovegitrepository.The following posts provide instructions in setting up the prerequisite project structure:
An pre-setup build definition that successfully builds the code in the repository.
The Setup
Enable Preview Features
As YAML build definitions are still in preview , users need to opt-in to the feature. Let's do this now:
Log-in to you VSTS instance with an Account Administrator. <
> Click on the Logged-in user profile picture. And click on the
Preview featuresin the resulting menu. This will will open up thePreview featuresdrawer.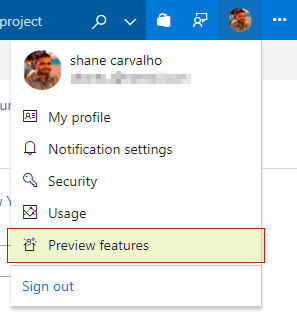
In the first drop down make sure that the
for this account [your-account-name]is selected. Next, turn on theBuild YAML definitionsfeature. <<>>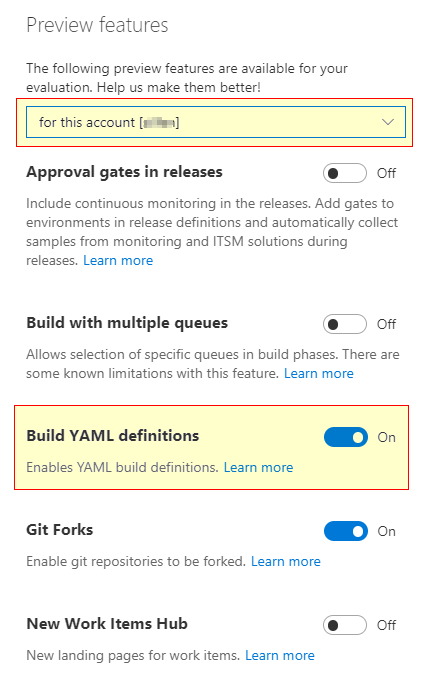
Export the Build Definition
Now let's navigate to our build definition that we're going to be using as the source template.
Navigate to your build using the menu
Build and Release > Buildand selecting theDefinitionstab.Click the ellipsis on the build definition and select
Edit...from the context menu.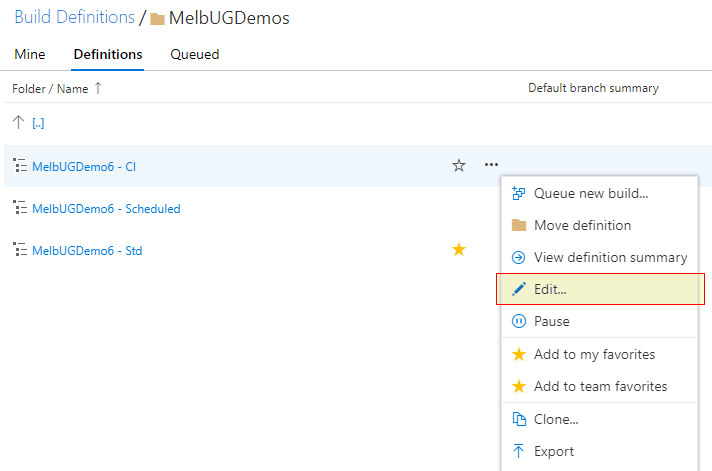
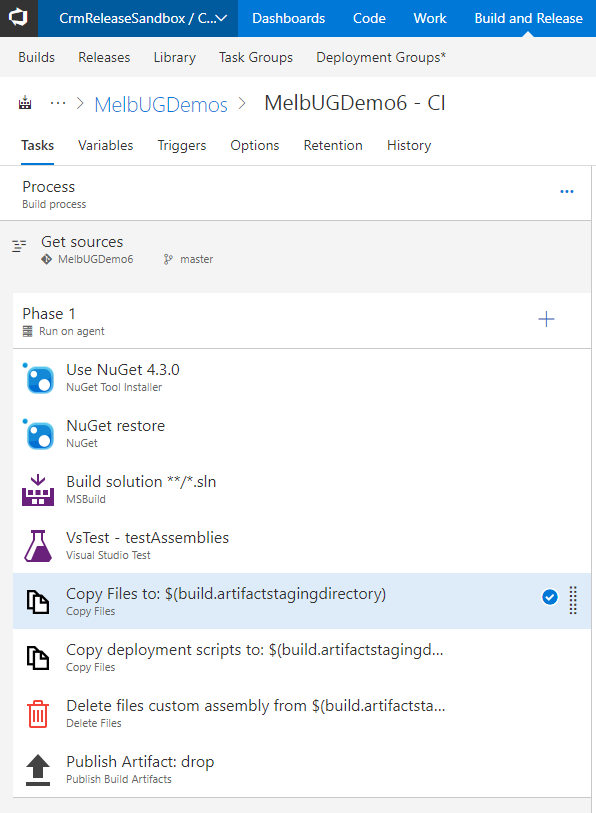
Note that this build definition uses a
MSBuildtask instead of aVisual Studio Buildas such does not require thevisualstudiodemand.If not already selected, click on the
Process- Build processoption.
Note the
View YAMLlink to the far right of the editor. Click on it to open a popup showing a generated YAML definition.
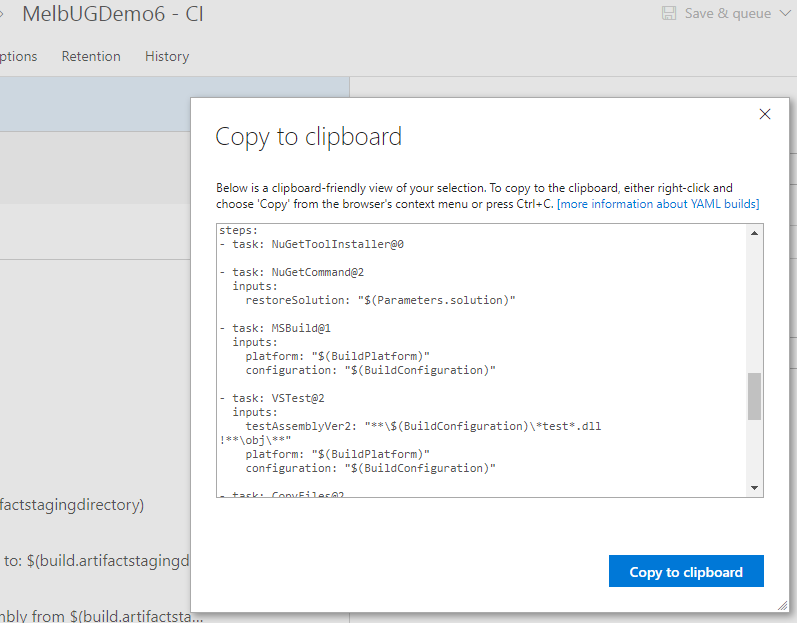
For reference, I've uploaded the generated file here.
Clean Up
The next step is to clean up and fix the exported script. The generation process identified some warnings and errors for us, so let's start with those. In this particular instance they were all related to variables not being defined:
<!-- snip -->

#Your build definition references an undefined variable named ‘Parameters.solution’. Create or edit the build definition for this YAML file, define the variable on the Variables tab. See https://go.microsoft.com/fwlink/?linkid=865972
#Your build definition references the ‘BuildPlatform’ variable, which you’ve selected to be settable at queue time. Create or edit the build definition for this YAML file, define the variable on the Variables tab, and then select the option to make it settable at queue time. See https://go.microsoft.com/fwlink/?linkid=865971

<!-- snip -->
The following variables were found to be undefined:
Parameters.solutionbuild.sourcesdirectorybuild.artifactstagingdirectory
And the following were identified as being set when the build is queued:
BuildPlatformBuildConfiguration
The errors related to the variables prefixed with build. are not a problem and can be safely ignored. They are predefined variables and are indeed available in the build environment.
Create a new PowerShell task that defines the variables and move it to the first in the order. Next set the
BuildConfigurationandBuildPlatformwas toreleaseandany cpurespectively. And finallyParameters.Solutionto the actual solution being built - as this example contains only one solution file, set it to**/*.sln.steps: - powershell: | Write-Host '##vso[task.setvariable variable=BuildConfiguration;]release' Write-Host '##vso[task.setvariable variable=BuildPlatform;]any cpu' Write-Host '##vso[task.setvariable variable=Parameters.solution;]**/*.sln' displayName: Create variablesNext, escape any slashes in task attribute values. I had to update
VSTest@2andCopyFiles@2tasks.- task: VSTest@2 inputs: testAssemblyVer2: "**\\$(BuildConfiguration)\\*test*.dll !**\\obj\\**" platform: "$(BuildPlatform)" configuration: "$(BuildConfiguration)" - task: CopyFiles@2 inputs: SourceFolder: "$(build.sourcesdirectory)" Contents: "**\\bin\\$(BuildConfiguration)\\**" TargetFolder: "$(build.artifactstagingdirectory)"Add a
displayNamenode for each of the tasks - this does not have an impact on the operation of the build itself, but makes it easier to keep track of the tasks being executed.<!-- snip --> - task: NuGetCommand@2 displayName: NuGet restore **\*.sln <!-- snip --> - task: MSBuild@1 displayName: Build solution **/*.sln <!-- snip --> - task: CopyFiles@2 displayName: "Copy Files to: $(build.artifactstagingdirectory)" <!-- snip --> - task: CopyFiles@2 displayName: "Copy Deployment Scripts to: $(build.artifactstagingdirectory)" <!-- snip --> - task: DeleteFiles@1 displayName: "Delete custom assemblies from $(build.artifactstagingdirectory)" <!-- snip --> - task: PublishBuildArtifacts@1 displayName: "Publish Artifact: drop" <!-- snip -->
And we're done. Download the final form of the file here.
Deployment
The deployment process itself is very simple, all we need to do is create a .vsts-ci.yml and drop it in the root of your repository and VSTS would automatically generate the CI build.
- Save the cleaned up build definition with the name of
.vsts-ci.ymland drop it in the root folder of your second project repository. - Commit your changes and push them to remote.
- Within VSTS, navigate to the
Build and Releaseand ensure that there is a new folder with the repository's name. - Navigate into this folder and verify that a new build has been created
your_repo_name CIand that it is currently in progress.
And that's it, you've got a working CI build.
Final Thoughts
Reusing Definition for Dynamics 365
Thanks to the use of the yeoman generator, my Dynamics 365 projects use an identical project structure. This mean that I can just copy the .vsts-ci.yml to the root of repository of the new project, make any project specific changes if necessary and you've got a working CI build.
Branching Behaviour
I was curious to find out what happens when we branch the YAML build. Does VSTS create a new instance of the definition for each of the branches? Look out for it's blog post.
Defining Variables via the UI
As an alternative to defining the variables using a PowerShell or Shell a task, they can also be defined using the VSTS user interface.
Skip the previous step where we initialize the variables using the PowerShell task. Continue on with the other steps.
Check-in and push the CI build to remote.
Navigate to the
Build and Releasemenu andBuildtab and verify that a new build was provisioned as expected.The initial check-in of the CI build itself is going to fail as it will be triggered the moment the build definition is provisioned.
Next,
Editthe definition and navigate to theVariablestab.Define the
BuildConfiguration,BuildPlatform,Parameters.solutionvariables: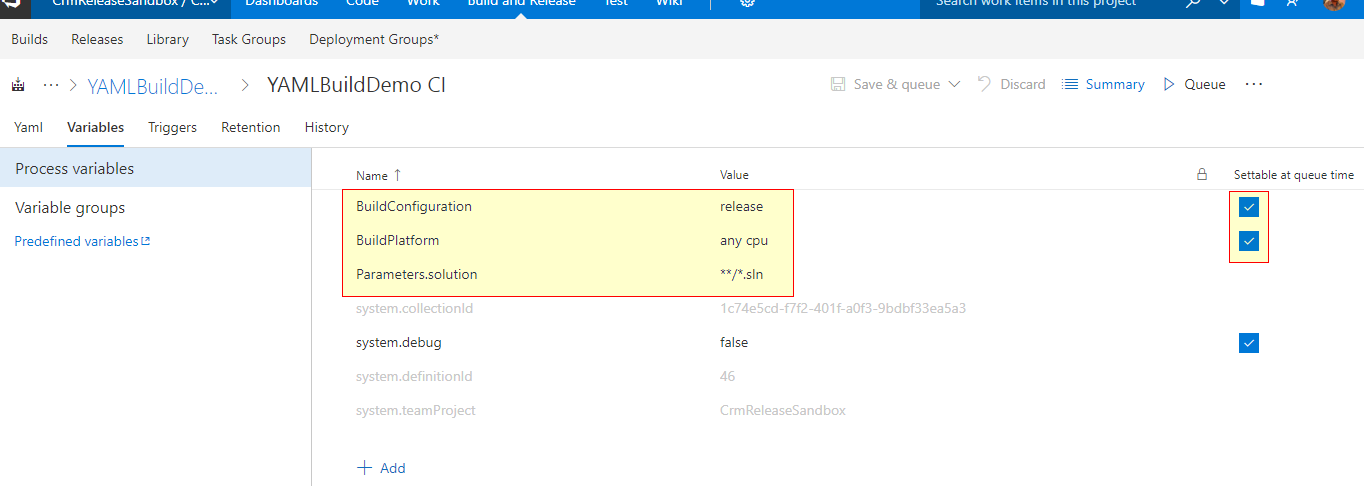
Test out your new definition by making a change to the repository or explicitly triggering a new build.
The downside of this method is that all the components required by the build definition is not contained within the YAML file.
So why would I want to take this approach? Secrets. This is the perfect way to store your secrets and avoid inadvertently checking them into your repository.
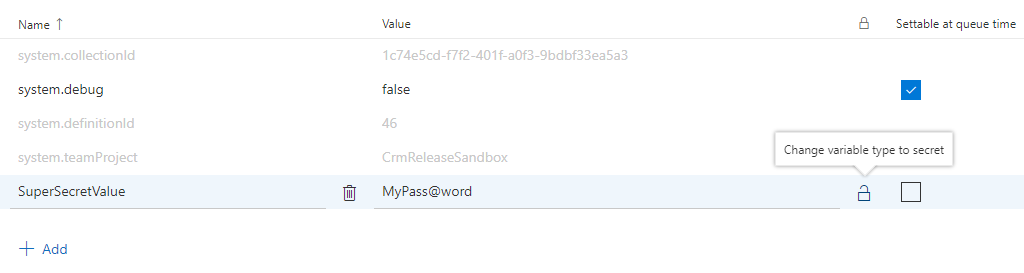
Therefore I would recommend using an hybrid approach. Should your CI build require the use of sensitive information, define them via the UI and place the rest of the variables in the script itself.
Alternative Approaches
I've noticed that different vendors and tend to have their own flavour of what a YAML build file format would look like. Unfortunately, this means that if a development team was to ever to switch build providers or fork a copy of the project to another build platform, they would likely need to rework or add platform specific build scripts.
One approach I have seen, especially in OSS projects, is to use a platform agnostic script (PowerShell / Shell) that can be used to build your application in isolation and setup the CI build task to make a call to this script. You still get a lot of the advantages mentioned previously, but forego the tight integration and features of a particular build systems.
Next Steps
Since most of the teams I work with use VSTS exclusively, I was super stoked when this announcement was made. This feature is a perfect candidate to be included as part of the generator-nullfactory-xrm yeoman generator as it removes the manual steps and further reduces the time it takes to setup a CI pipeline within VSTS.
The next release of the generator will include the ability to generate a tailored CI build for VSTS with the I hopes of adding other providers in the future. It's will be implemented as a sub-generator and would needed be opted into.
References
- VSTS Build Definitions as YAML Part 1: What and Why? | Kloud Blog
- VSTS YAML Builds (Pipeline as code) - Marcus Felling
- Pipeline as code (YAML) preview – Microsoft DevOps Blog
- VSTS Build Definitions as YAML Part 2: How? | Kloud Blog
- Build and Release Automation Phases in VSTS and TFS | Microsoft Docs
- CI Build in code using YAML | Microsoft Docs
- Define and modify your variables in a script | Microsoft Docs
- vsts-agent/yamlgettingstarted-powershell.md at master · Microsoft/vsts-agent
- Chaminda's Blog: Build Definition as Code with YAML Builds
- vsts-agent/.vsts.ci.yml at master · Microsoft/vsts-agent
- Build variables | Microsoft Docs
- Eric Williams - VSTS: YAML Build Definitions
- Matt's ALM space: YAML Build Definitions in the Team Build, now what?