Continuous Integration and Continuous Delivery of Dynamics 365 Solutions using VSTS
25 Jun 2017 | ALM | Visual Studio Team Services | Dynamics CRM | Dynamics CRM Online | Git
In previous posts I've setup build and release defintions for Dynamics CRM solutions and in this one I try my attempt at setting up an automated Continuous Delivery pipeline. There are two popular strategies used to make sure that every change made to a system can be deployed successfully to secondary environment:
Continuous Integration (CI)
A CI build is one that is usually kicked off any time a piece of code is checked-in in order to give early visibility of any potential failures. The success of a build is dependent on the actual build plus any unit tests.
Scheduled
A scheduled build, also commonly referred to as a
Nightly Build, is a build and release that is performed on a regular cadence - usually every night. Once again, on the successful completion of the build and automated unit test, a new release is pushed to the staging environment.
Both methods appear to be doing the same thing, so when should I choose a CI build + release over a scheduled build? The most common metric appears to be the duration of your build and unit tests. The size of the team, the project and code complexity and the frequency of check-ins can have an impact on the time it takes for build and long running unit tests to execute. In these scenarios a Scheduled build makes more sense.
Overview
I was disappointed to find out that, at the time of writing this post, VSTS release definitions does not provide an option to trigger off a successful a scheduled build. The only options available are to trigger it off of a CI build or the automated schedule on the release itself.
Luckily, Rene van Osnabrugge's excellent post provides us with a workaround for this restriction. Here's an overview how it works:
- Setup a single build that performs all three roles (manually invoked, CI and scheduled).
- Add a task into the build that would to figure out which method was used to invoke.
- Apply the the reason as a build tag onto itself.
- Update the release definition to filter the the release trigger to be filtered only the scheduled tags.
Lets get started setting it up.
Enforce Code Standards by Integrating StyleCop Validations
StyleCop is a configurable analysis library that ensures code produced conforms to it's coding standard. While the benefits of a consistent coding standard is clear, each team has there own strong opinions how it should be enforced.
In my previous projects I've used the StyleCop.MsBuild package and have been eager to try out the code analyzer version of the tool. In this post, I will start off with a quick run down of my attempt at integrating it into a solution.
Prerequisites
- Visual Studio Professional 2015 or higher. Its not really necessary, but makes for an easier setup and nicer integration with the Roslyn base analyzer.
- If integrating with an SCM or Automated build - Visual Studio Team Services (VSTS) using git. The steps are not limited to VSTS, but its just my personal preference.
Installation
Installation itself is pretty simple - just install the StyleCop.Analyzers nuget package by running the following command in the package manager console witihin Visual Studio:
Install-Package StyleCop.Analyzers
That's it. That all we need to do to get started.
Warning Vs. Error
By default StyleCop treats suggestions as warnings, but I prefer to go strict mode and treat all style cop validations as errors. This means that build actually fails if the code does not adhere to the style validations. My justification is that its always cheaper to fix these issues early in the development cycle as well as minimizing "broken windows syndrome".
When using the older StyleCop.MSBuild package, I could just set the StyleCopTreatErrorsAsWarnings environmental variable in the development machine or the team build and it will ensure that the the scope is limited to the StyleCop errors only. Unfortunately, with the Analyzers project it does not seem to be that simple. There exists an TreatWarningsAsErrors environmental variable, but this is global and treats any warnings as errors - not what I want.
Resolving a Race Condition Within a Dynamics 365 Process
09 Jun 2017 | Dynamics CRM | Dynamics CRM Online
I was attempting to diagnose and issue for a client the other day. It revolves around a single workflow that is being executed on both the create and update event of a field. And within this workflow, a custom activity executed if the field matches a certain condition. The problem was that the custom activity was being executed twice when it was only expected to run once.
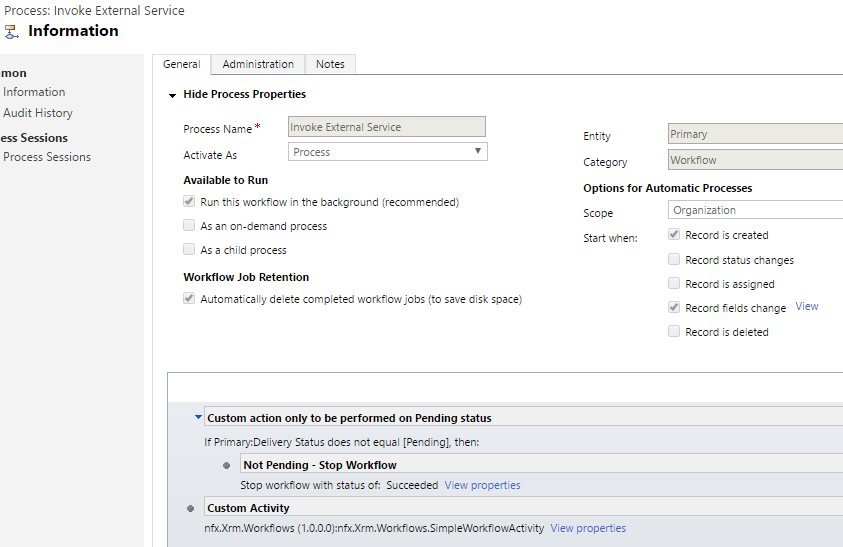
If we take the above example, it can be replicated easily:
- Create a new record where
Delivery StatusisCurrent. - Immediately update the record to
Pending.
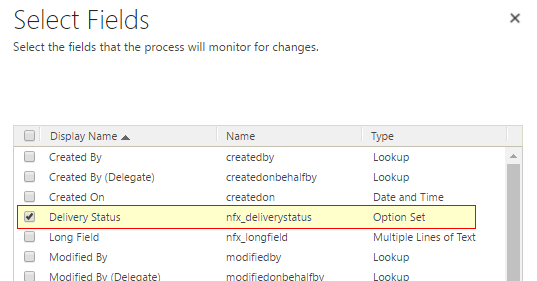
Navigate to the background processes and ensure that the workflow was executed twice, once on the create and then again on the update. If you performed the update soon enough, you notice that both instances satisfied the citieria and the custom activity invoked.
This behaviour is by design - when an async workflow is triggered it neither guarantees the immediate execution of the process nor the state of the record at the time it was queued. This means that the workflow would work against the latest version of the record at the time of execution.
Gated Check-ins in Visual Studio Team Services using TFSVC and Git
15 May 2017 | Visual Studio Team Services | TFSVC | ALM | Git
A continuous integration build ensures that the code within a source control repository can be compiled successfully after a commit. It is defined as:
Continuous Integration (CI) is a development practice that requires developers to integrate code into a shared repository several times a day. Each check-in is then verified by an automated build, allowing teams to detect problems early.
Where as CI builds occur after a commit has been merged into the repository, a gated check-in is a "pessimistic" process that would treat a commit as completed only if the result of it being merged with the repository is a successful build.
In this post I will try my hand in setting up a gated check-in using Visual Studio Team Services (VSTS). I will start off with TFSVC as the underlying version control system and then replicate the same functionality using Git.
Configuring a Gated Check-In Using TFSVC
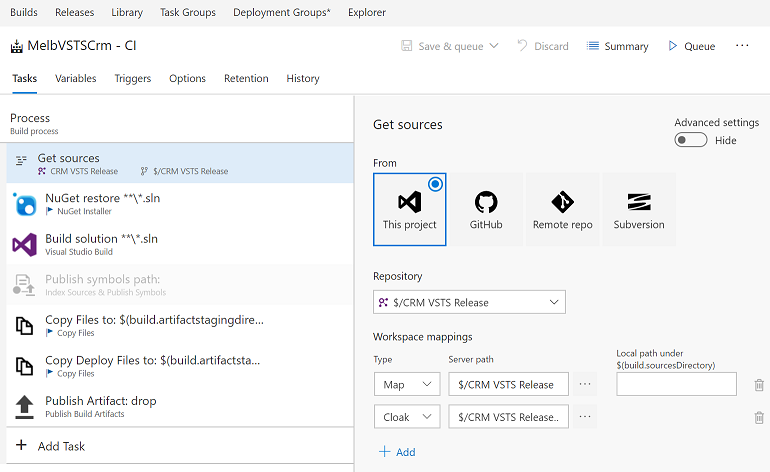
Prerequisite: A repository already exists in the remote server with project code checked-in. I will be using one of my demo CRM projects.
Define the steps for the build that would act as the verification build.
Navigate to the
Triggerstab within the build definition and enabling theGated Check-Intrigger.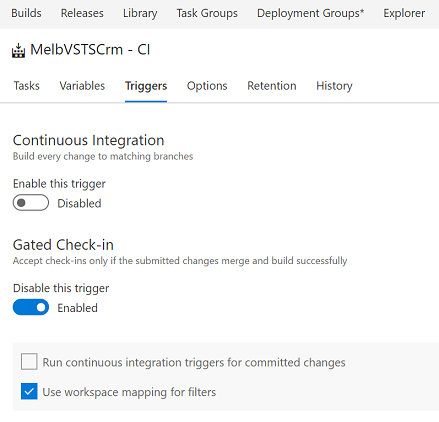
Reassignment of Record Causes Attached Notes to Update its ModifiedBy User Field in Dynamics CRM
04 May 2017 | Dynamics CRM | Dynamics CRM Online
My colleagues and I ran into a interesting problem the other day; we noticed that on some records all the notes attached to it were being updated seemingly randomly being updated. At first glance I was confused as to why this was happening, but we eventually found the steps to reproduce it:
- Create a record
Record 1in an entity. This can either be a custom entity or out-of-the-box entity with notes and attachments enabled. - If the notes control has not been added onto the form, do that now.
- Update it such that it has several notes created by different users.
- Next make sure that
Record 1is owned byUser A. - Login as
User Band reassign theRecord 1toUser C.
Now, if we observe the notes control it shows User B's name along side the date and time stamp.
I was initially thrown off as to why the above actions changed the Created By of the notes, but what I failed to realize was that the annotation control shows the Modified By user and not the Created By.
Enforce Commit Message Standards and Generate Changelogs via Git
30 Apr 2017 | Git | ALM | npm | nodejs | commitizen | conventional-changelog
In past projects my release note strategy has been a combination of custom scripts (to pull the changesets between releases) and good old fashioned elbow grease to manually create the notes. I was curious to know ways about the ways to achieve the same in git and learning about the techniques used in popular open source projects.
In order to automatically generate a changelog the repository requires consistent commits - and I found that there are three steps that can be done to achieve this:
- Enforcing commit message rules.
- Install and setup tools that help generate commit messages that are compliant.
- Generate the changelog for the project based on the commits.
Prerequisites
- Node.js - instructions on installing node can be found here.
- A
package.jsonfile for your project. One can be generated by navigating to the root folder of the project, run thenpm initcommand and follow the instructions
Enforcing Commit Message Rules
The enforcing of the rules are done using husky and validate-commit-msg packages. Husky makes it very easy to tap into the commit event and execute custom validation scripts and uses git hooks to do this. validate-commit-msg implements the validation scheme - conventional commits - that we would be used when the commit occurs.
The conventional commits specification site summarizes its advantages very well:
- Automatically generating CHANGELOGs.
- Automatically determining a semantic version bump (based on the types of commits landed).
- Communicating the nature of changes to teammates, the public, and other stakeholders.
- Triggering build and publish processes.
- Making it easier for people to contribute to your projects, by allowing them to explore a more structured commit history.
Deploy Dynamics CRM Solutions using VSTS and Octopus Deploy - Part 3 - Release and Deployment
25 Apr 2017 | Octopus Deploy | Dynamics CRM | Dynamics CRM Online | generator-nullfactory-xrm | Visual Studio Team Services | ALM | Git
In this third and final installment I cover the steps involved in setting up the minimum release and deployment steps required for a successful Dynamics CRM/365 deployment. The steps and actions performed in the previous posts acts as prerequisites for this one.
Related posts from the series:
- Deploy Dynamics CRM Solutions using VSTS and Octopus Deploy - Part 1 - Setup
- Deploy Dynamics CRM Solutions using VSTS and Octopus Deploy - Part 2 - Build
- Deploy Dynamics CRM Solutions using VSTS and Octopus Deploy - Part 3 - Release and Deployment
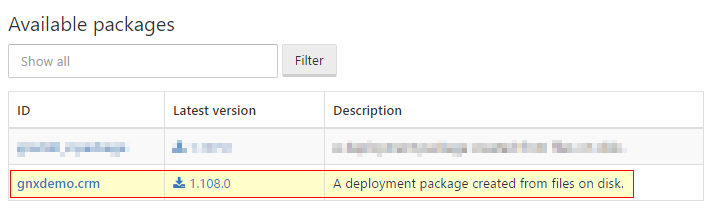
The Packages
In the previous post, I setup the team build to automatically publish packages into the Octopus Deploy package repository.
We can verify that they have indeed been published by navigating to the Library > Packages tab for a list of available packages.
Defining the Environment
Environments are a logical grouping of targets / machines used by deployments. For the purpose of this post, I will create one environment - Testing and it would contain a single CRM deployment target - the CRM Server).
- Let's start off by clicking on the
Environmentsfrom the main menu to navigate to the environment configuration page. - Click on
Add environmentin the resulting page. Set
Testingas the name of the environment .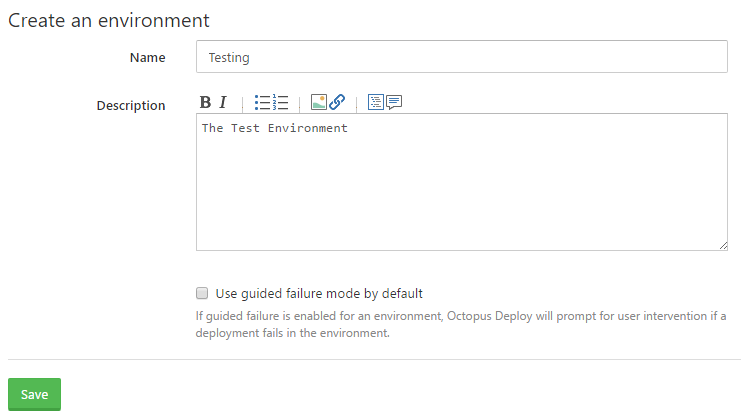
- Click on
Saveto confirm selection.
Deploy Dynamics CRM Solutions using VSTS and Octopus Deploy - Part 2 - Build
24 Apr 2017 | Octopus Deploy | Dynamics CRM | Dynamics CRM Online | generator-nullfactory-xrm | Visual Studio Team Services | ALM | Git
This is the second part of a series of posts where I attempt to deploy a Dynamics 365/CRM solution using Visual Studio Team Services (VSTS) and Octopus Deploy (OD). Previously, I setup an OD server and integrated it with VSTS - the steps describe in that post act as a prerequisite for this one. In this post we go about modifying an existing Dynamics CRM build definition to automatically package the release-artifact and upload it to the OD server for deployment.
Related posts from the series:
- Deploy Dynamics CRM Solutions using VSTS and Octopus Deploy - Part 1 - Setup
- Deploy Dynamics CRM Solutions using VSTS and Octopus Deploy - Part 2 - Build
- Deploy Dynamics CRM Solutions using VSTS and Octopus Deploy - Part 3 - Release and Deployment
Publishing Packages
There are a few different ways of getting a package into Octopus Deploy:
- Remotely upload a package to Octopus Deploy's built-in repository.
- Make octopus deploy pull packages from an external feed. Find more information here on setting up VSTS to publish an package feed.
- Manually upload the package into the built-in repository.
And the method of publishing the package has no bearing on the end deployment -I chose to explicitly push to the remote octopus deploy server.
Deploy Dynamics CRM Solutions using VSTS and Octopus Deploy - Part 1 - Setup
23 Apr 2017 | Octopus Deploy | Dynamics CRM | Dynamics CRM Online | generator-nullfactory-xrm | Visual Studio Team Services | ALM | Git
I have seen Octopus Deploy (OD) being mentioned frequently in the community but haven't had a chance to play around with it myself. Therefore, I think that attempting to deploy a Dynamics 365/CRM solution using Octopus Deploy seemed like the perfect exercise to learn more about the platform and its features.
I was curious if there were other developers who have released Dynamics CRM using Octopus Deploy and sure enough there was some one who had already thought of that.
In this series of posts I try to cover everything from setting up integration with Visual Studio Team Services(VSTS), updating a build definition to automatically publish itself and then finally setting up a simple release and deployment pipeline.
Related posts from the series:
- Deploy Dynamics CRM Solutions using VSTS and Octopus Deploy - Part 1 - Setup
- Deploy Dynamics CRM Solutions using VSTS and Octopus Deploy - Part 2 - Build
- Deploy Dynamics CRM Solutions using VSTS and Octopus Deploy - Part 3 - Release and Deployment
Prerequisites
- Project structure and deployment scripts based on generator-nullfactory-xrm (with a minimum version of at least 1.4.0). Read More
- The project checked into Visual Studio Team Services (VSTS) using either
gitortfsvcwith a working team build already setup. Read More. - Installation of Octopus Deploy and ensure sure that it is publicly accessible. Read More.
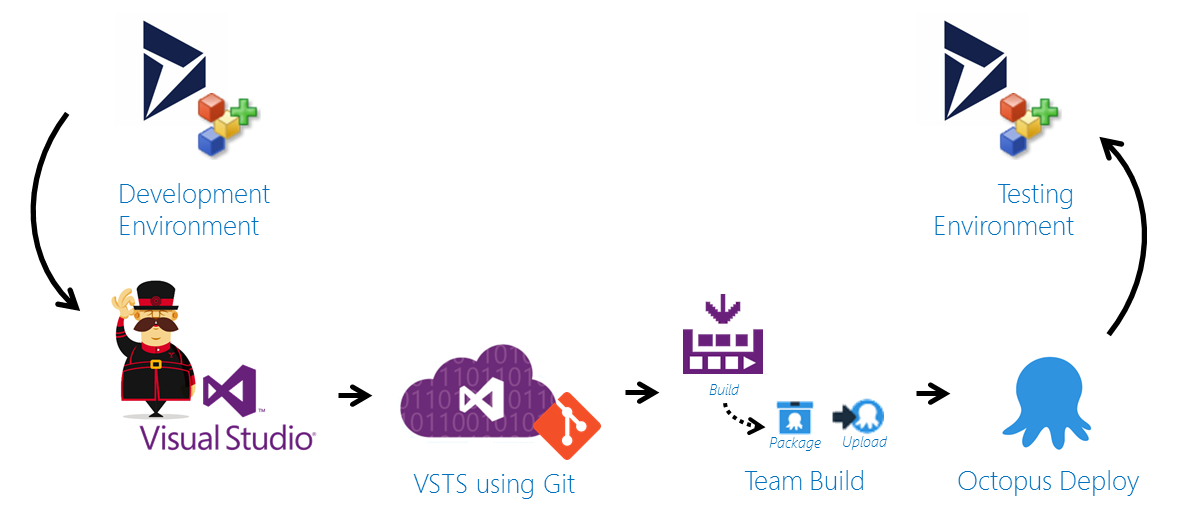
The Strategy
When I saw the integration tasks provided by the OD extensions for VSTS, my first reaction was to divide the tasks between the build and the release in VSTS. I wanted to the the build definition to build and package the solution and pass it on to release management. Release management would then publishing the release-artifact to OD and explicitly remote trigger the OD deployment.
While it was certainly possible to set this up, its did not make sense to have two deployment services for the same pipeline. Therefore the strategy is going to be very similar to the one that I had done previously - VSTS would continue to act as the version control and build server but this time Octopus deploy would act as the release component.
The build server would handle creating compatible package and uploading it to the OD package repository. And OD takes over the management of the environment, release and deployment complexities.
Version 1.4.0 of generator-nullfactory-xrm Published
18 Apr 2017 | Dynamics CRM | Dynamics CRM Online | Yeoman | npm | nodejs | generator-nullfactory-xrm
Version 1.4.0 of the generator released. It includes the following changes:
- Added support to deploy third-party CRM solutions.
- CRM SDK assemblies updated:
- Microsoft.CrmSdk.CoreTools
8.1.0.2=>8.2.0.4 - Microsoft.CrmSdk.CoreAssemblies
8.1.0.2=>8.2.0.2 - Microsoft.CrmSdk.Workflow
8.1.0.2=>8.2.0.2
- Microsoft.CrmSdk.CoreTools
- If opted-in to generate plugins and workflows projects, the generator would automatically create mapping entries in the
mapping-xmlfile. - PowerShell script updates:
- Better handling of exception and failure flows.
*.param.ps1scripts to have high verbosity by default.- Fixed deploy script to have the new solution name. (i.e.
ProjectPrefix+SolutionName) - Improved help documentation.