Release Strategy for Dynamics CRM - Part 5 - Deploy Third-Party Solutions
16 Apr 2017 | Dynamics CRM | Dynamics CRM Online | generator-nullfactory-xrm | Visual Studio Team Services | Team Foundation Server | ALM | Git
More often than not the custom Dynamics 365 solutions I develop depend on third party solutions to provide additional functionality. Therefore these solutions become a pre-requisite to the successful deployment of my own solution.
In this post I go about updating the previously setup project, build and release definitions in Visual Studio Team Services (VSTS) in order to enable deployment of third party CRM solutions.
Pre-requisites
- Project structure and deployment scripts based on generator-nullfactory-xrm (with a minimum version of at least 1.4.0).
- A working build and release definitions already setup.
Read more about setting up the project structure and build here:
- Release Strategy for Dynamics CRM - Part 1 - Preparation
- Release Strategy for Dynamics CRM - Part 2 - Setting Up the Build
- Release Strategy for Dynamics CRM - Part 3 - Setting Up the Release
Project Structure
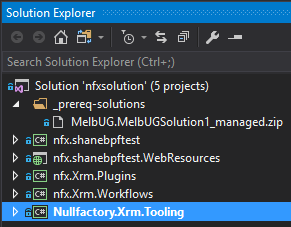
I start off by adding a solution level folder to hold third party solutions and check-in the changes into source control.
Special Characters in Primary Field Breaks SharePoint File Upload in Dynamics 365
14 Apr 2017 | Dynamics CRM | Dynamics CRM Online
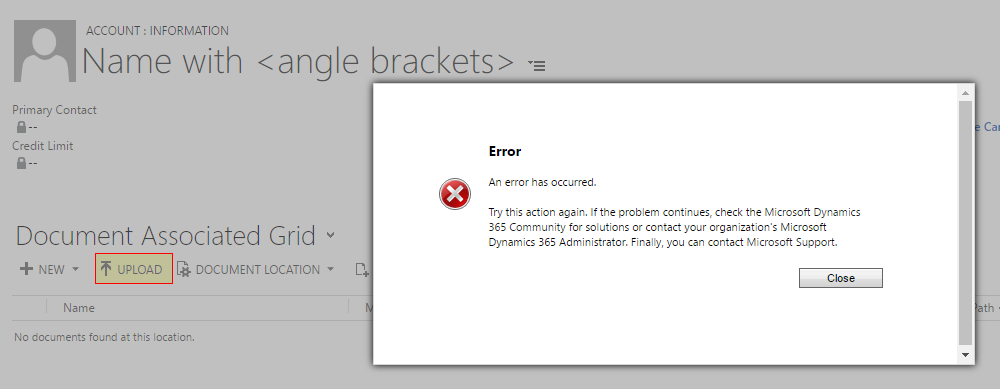
My colleagues and I ran into this confusing issue the other day. We've been working on a Dynamics 365 Online instance integrated with SharePoint (as a server side configuration) and everything seem to be working as expected but for a few records. On these records, anytime the user hits the upload button in document management they are greeted with the following error message instead of the expected upload dialog:
An error has occurred.
Try this action again. If the problem continues, check the Microsoft Dynamics 365 Community for solutions or contact your organization's Microsoft Dynamics 365 Administrator. Finally, you can contact Microsoft Support.
Source Control and Release Management - Presentation Slide Deck
12 Apr 2017 | Dynamics CRM | generator-nullfactory-xrm | Miscellaneous
A few weeks back, I did a presentation on Source Control and Release Management Strategy for Dynamics 365 Solutions at the Melbourne Dynamics 365 User Group. Here is the slide deck for that presentation:
Release Strategy for Dynamics CRM - Part 4 - Versioning
07 Feb 2017 | Dynamics CRM | Dynamics CRM Online | generator-nullfactory-xrm | Visual Studio Team Services | Team Foundation Server | ALM | Git
In this post I detail my approach to implement an automated versioning strategy in CRM solutions and its custom assemblies with the help of Visual Studio Team Services.
Although I originally only intended it to be a 3 part series I think I will continue to add to it as I keep making improvements. To recap, I previously prepared the project structure to host a CRM solution with the aid of the nullfactory-xrm generator and created a build and release definitions for it. You can find the previous posts here:
- Release Strategy for Dynamics CRM - Part 1 - Preparation
- Release Strategy for Dynamics CRM - Part 2 - Setting Up the Build
- Release Strategy for Dynamics CRM - Part 3 - Setting Up the Release
- Release Strategy for Dynamics CRM - Part 4 - Versioning
There were two aspects of versioning that I wanted to automatically increment with each release. Firstly the CRM Solution itself and then the custom assemblies included as part of the solution. I also wanted the flexibility to version the two independently of each other (I don't think its a very common scenario, but I would still like to have it as an available option).
As with my previous posts, the instructions in this are specific to Visual Studio Team Services (VSTS), but can be adapted to work with other build and release systems.
Scheduling the Uptime of an Azure Virtual Machine
28 Nov 2016 | Azure
In a previous post I setup a build agent in a private pipeline - hosted within a Azure Virtual Machine (VM). In this one, I try to minimize the uptime of the VM by making it run only during work hours - I require it to start automatically first thing in the morning and then turn itself off at the close of business. In order to achieve this I make use of the Azure Automation feature.
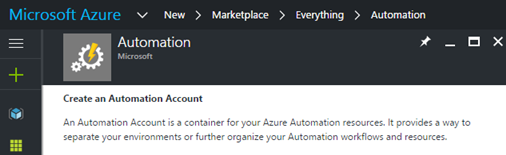
Let's start off by logging into our Azure account and creating a new
Automation Accountentry.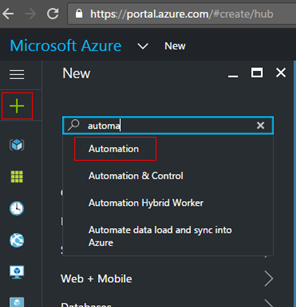
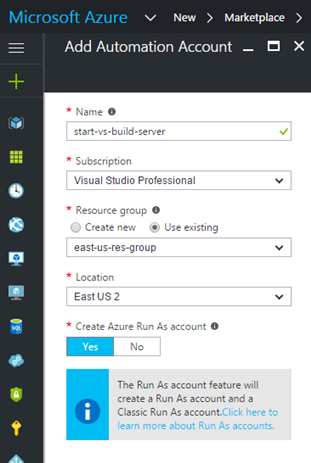
Provide the required details:
Name- Name for the automation account.Subscription- Azure subscription for this account.Resource Group- Create or select an existing resource group from the list.Location- Select an available region from the list.Create Azure Run As account- SelectYes.
Click the
Createbutton to start provisioning the automation account.Once done, navigate to it's blade via the resource groups and click on the
Runbookswidget.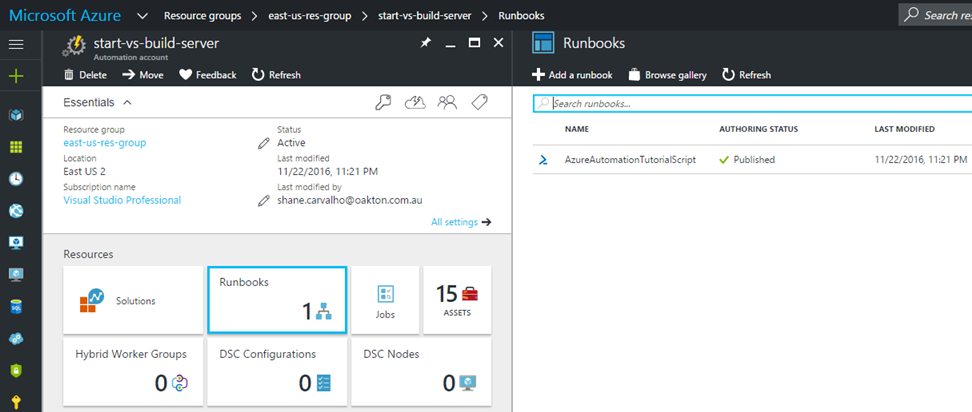
Setting up a Private Build Agent in Visual Studio Team Services
26 Nov 2016 | Visual Studio Team Services | Team Build | ALM | Azure
I've started working on a new hobby project hosted in Visual Studio Team Services (VSTS) and was keen to follow mature build and release practices on it. Given that I am essentially a one man team, I decided to make due with the free tiers. One of the limitations in this tier is the number of CPU cycles available for hosted builds and releases. This means that if I setup all - continuous integration (CI) build, standard build and release definition I am surely going to use up all the available minutes.
The goal was to keep the overall costs low without sacrificing any build and release related automation. Luckily, VSTS allows us to host our own agents on a private pipeline. This seemed the ideal a minimalist setup for me, this looked to be cheaper than having additional hosted pipelines. Also worth noting that VSTS currently provides one private pipeline in the free tier with the ability to purchase more private agents (which is slightly cheaper than the hosted).
In this post I go about setting up a virtual machine and then install and configure a build/release agent that can be used by the team builds and releases.
Provisioning the Virtual Machine
- Start off by creating a new resource group dedicated for the build server(s). This is so that we can tie the scheduler to shutdown all agents in a resource group without having to shutdown individual servers.
- Next, let's provision a new Windows virtual machine, customize this as you see fit - I used a standard Windows 10 machine. In order to make life easier, I chose a higher tier during your setup with the intention of scaling it down to a lower one once everything is setup.
- For this to be a viable build server, I installed the .NET 4.5.2 targeting pack. Alternatively, you could install Visual Studio Community Edition or any other dependencies that your particular build might require.
Installing the Agent
- Log into the newly provisioned virtual machine.
- Next, open a browser and log in to your VSTS instance from within it and navigate to settings page by clicking on the cog icon. Then click the
Agent poolssub menu in order to view the list of available agent pools. Click on the
Download Agentbutton and follow the instructions to install the agent.
Release Strategy for Dynamics CRM - Part 3 - Setting Up the Release
18 Nov 2016 | Dynamics CRM | Dynamics CRM Online | generator-nullfactory-xrm | Visual Studio Team Services | Team Foundation Server | ALM
This is the final installment of the a three part series. Use to following links to access part 1 and 2:
- Release Strategy for Dynamics CRM - Part 1 - Preparation
- Release Strategy for Dynamics CRM - Part 2 - Setting Up the Build
- Release Strategy for Dynamics CRM - Part 3 - Setting Up the Release
- Release Strategy for Dynamics CRM - Part 4 - Versioning
In the previous two posts I show you how to create the project structure and create a basic team build for your CRM solution artifacts. In this final installment I go about setting up a release definition for the build that we created.
- Let's start off by creating a new release by navigating to the
Build and Release > Releasein your team project. Select the
Emptytemplate option and click the next button.
On the next step, choose the source for this release - we'll be using the build definition that we created in part 2. Once ready click the
Createbutton.
Now lets declare the variables that would be used later in the process. Navigate to the
Variablestab and define the following variables:DevDeployLogin- The username that used to deploy the solution.DevDeployPassword- The password for the same account.
Make sure to define the
DevDeployPasswordas a secret by clicking the padlock icon next to the field.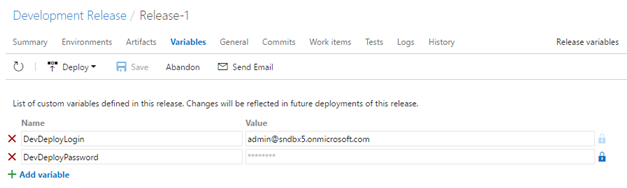
Read more about build and release variables here.
Release Strategy for Dynamics CRM - Part 2 - Setting Up the Build
12 Nov 2016 | Dynamics CRM | Dynamics CRM Online | generator-nullfactory-xrm | Visual Studio Team Services | Team Foundation Server | ALM
This is the second of a three part series in which I walk through setting up a release management strategy for Dynamics CRM.
- Release Strategy for Dynamics CRM - Part 1 - Preparation
- Release Strategy for Dynamics CRM - Part 2 - Setting Up the Build
- Release Strategy for Dynamics CRM - Part 3 - Setting Up the Release
- Release Strategy for Dynamics CRM - Part 4 - Versioning
In first part of the series accomplished the following:
- Setup the project structure using the
nullfactory-xrmyeoman generator. - Download the CRM solution from the remote server and unpacked it using the solution packager tool.
- Checked-in all the artifacts back into Visual Studio Team Services (VSTS) source control.
In this post I describe the steps required for setting up a team build. One of the goals with the generated project structure was to have it work with team builds with the least amount configuration.
Setting Up the Team Build
Navigate to the
Build and Release > Buildsfrom within the VSTS team project.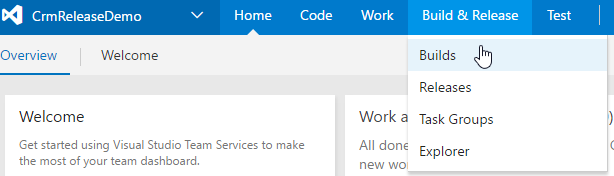
Create a new build definition using a vanilla
Visual Studiotemplate.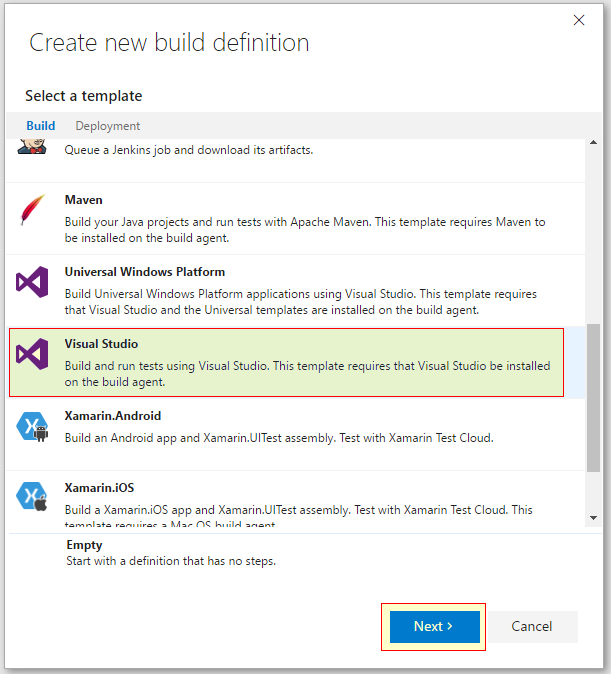
Release Strategy for Dynamics CRM - Part 1 - Preparation
30 Oct 2016 | Dynamics CRM | Dynamics CRM Online | generator-nullfactory-xrm | Visual Studio Team Services | Team Foundation Server | ALM | Git
Earlier this year I demonstrated the strategy I use for maintaining CRM solutions in source control. I favor the approach due to its ability to be used in team builds and automated releases. Since my original post, I have created a yeoman generator that allows to quickly scaffold the project structure for new projects. And now, in this series of posts, I will walk you through the steps in setting up a new project, creating a team build finally implementing a release strategy using Visual Studio Team Services.
- Release Strategy for Dynamics CRM - Part 1 - Preparation
- Release Strategy for Dynamics CRM - Part 2 - Setting Up the Build
- Release Strategy for Dynamics CRM - Part 3 - Setting Up the Release
- Release Strategy for Dynamics CRM - Part 4 - Versioning
In order to automate the process we first need to make sure that the solution is maintained in source control.
Prerequistes
- Visual Studio Team System (VSTS) source control.
Yeomancode generator with thegenerator-nullfactory-xrminstalled globally. Installation instructions can be found here.
While in this particular demo I use a VSTS team project running on top of Git source control along with VSTS Release Management for the deployment, the same steps can be adapted to be used with any other build and release system.
Prepping the Solution
- Create a Team Project and select
Gitas the version control. - Clone a working copy onto a local machine.
- Create a .gitignore file that excludes build output - let's use GitHub's definitions for Visual Studio.
Run the
nullfactory-xrmyeoman generator in order to scaffold the project structure. More detailed instructions on running the generator can be found here.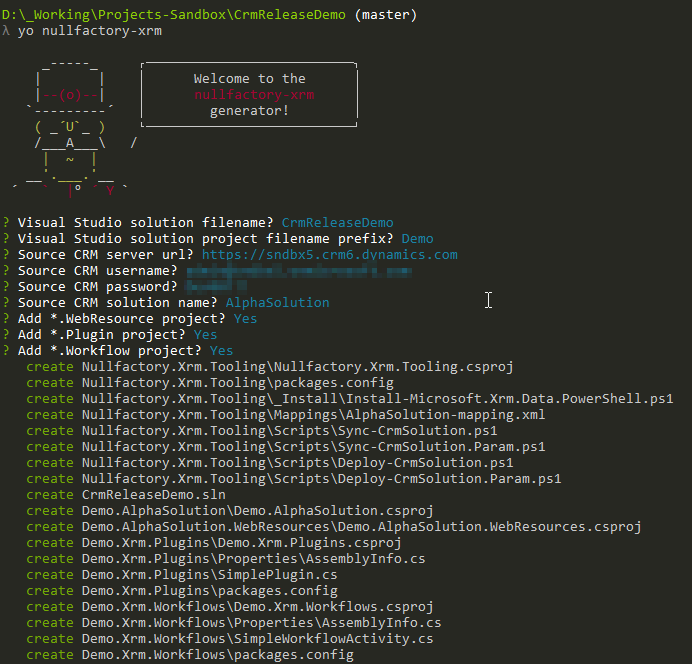
Yeoman Generator For Dynamics CRM Solutions
15 Sep 2016 | Dynamics CRM | Dynamics CRM Online | Yeoman | npm | nodejs | generator-nullfactory-xrm
I've previously experimented on creating a simplified way of maintaining CRM solutions in source control. While I was quite happy with the end result, the process of setting up the projects, scripts and post-build steps was a little bit tedious.
This is where Yeoman code generator comes in. Yeoman is a very popular javascript based scaffolding engine that enables setting up new projects a breeze. I created my own custom generator that would help me to kick start new CRM solutions quickly. You can find the end product here: https://www.npmjs.com/package/generator-nullfactory-xrm
Installation
First, install Yeoman and generator-nullfactory-xrm using npm.
npm install -g yo
npm install -g generator-nullfactory-xrm
Then generate your new project:
yo nullfactory-xrm
Execution
Template questions and their purpose:
- Visual Studio solution file name?
The visual studio solution filename. - Visual Studio project prefix?
The prefix for the projects generated. This can be an organization name or preferred convention. - Source CRM server url?
This is the source CRM server url. Example:[https://sndbx.crm6.dynamics.com](https://sndbx.crm6.dynamics.com) - Source CRM Username?
The username used to connect to the source CRM server. - Source CRM Password?
The password for the above account. - Source CRM Solution Name?
The name of the CRM solution to be extracted. - Add *.WebResource project?
Specifies if a new project should be created to manage the web resouces. - Add *.Plugin project?
Specifies if a new plugin project should be created.